目录
1. 环境
| IP | 系统版本 | 部署服务 | 端口 |
|---|---|---|---|
| 192.168.0.40 | CentOS6.5_64 | Nginx1.12.0 | 8088 |
| 192.168.0.41 | CentOS6.5_64 | apache-tomcat-7.0.64 | 18088 |
| 192.168.0.42 | CentOS6.5_64 | apache-tomcat-7.0.64 | 18088 |
准备安装包:
|
1 2 3 4 5 |
nginx-1.12.0.tar.gz openssl-1.1.0f.tar.gz pcre-8.41.zip zlib-1.2.11.tar.gz |
2. 安装依赖
yum -y install gcc automake autoconf libtool make gcc-c++
2.1. openssl
|
1 2 3 4 5 6 |
tar -zxvf openssl-1.1.0f.tar.gz cd openssl-1.1.0f ./config make make install |
2.2. zlib
|
1 2 3 4 5 6 |
tar -zxvf zlib-1.2.11.tar.gz cd zlib-1.2.11 ./configure make make install |
2.3. pcre
|
1 2 3 4 5 6 |
unzip pcre-8.41.zip cd pcre-8.41 ./configure make make install |
2.4. nginx
|
1 2 3 4 5 6 |
tar -zxvf nginx-1.12.0.tar.gz cd nginx-1.12.0 ./configure --with-pcre=../pcre-8.41/ --with-zlib=../zlib-1.2.11/ --with-openssl=../openssl-1.1.0f/ make make install |
3. 配置
配置文件 conf/nginx.conf
3.1. tomcat HA 相关配置
修改 /usr/local/nginx/conf/nginx.conf 的 http 部分为以下内容
|
1 2 3 4 5 6 7 8 9 10 11 12 13 14 15 16 17 18 19 20 21 22 23 24 25 26 27 28 |
http { include mime.types; default_type application/octet-stream; log_format main '$remote_addr - $remote_user [$time_local] "$request" ' access_log logs/access.log main; sendfile on; keepalive_timeout 65; upstream my-web-server { server 192.168.0.41:18088; server 192.168.0.42:18088; } server { listen 8088; server_name localhost; access_log logs/host.access.log main; location / { proxy_pass http://my-web-server; proxy_set_header Host $host; proxy_set_header X-Real-IP $remote_addr; proxy_set_header X-Forwarded-For $proxy_add_x_forwarded_for; } error_page 500 502 503 504 /50x.html; location = /50x.html { root html; } } |
Tips:
- 注意配置文件中的参数对应关系:upstream: my-back-server 和 proxy_pass: http://my-back-server ;
- upstream 中的server可设置多个类似:server 192.168.0.41:18088;
4. 测试 TomcatHA效果
1、分别在 192.168.0.[41-42] 部署Tomcat应用。
2、修改tomcat下webapp/ROOT/index.jsp,增加特定标识以便测试;
3、修改tomcat下conf/server.xml,修改http端口为18088,为防止端口冲突;
4、浏览器打开: http://192.168.0.41:18088 刷新页面,一起正常会交替显示如下信息;
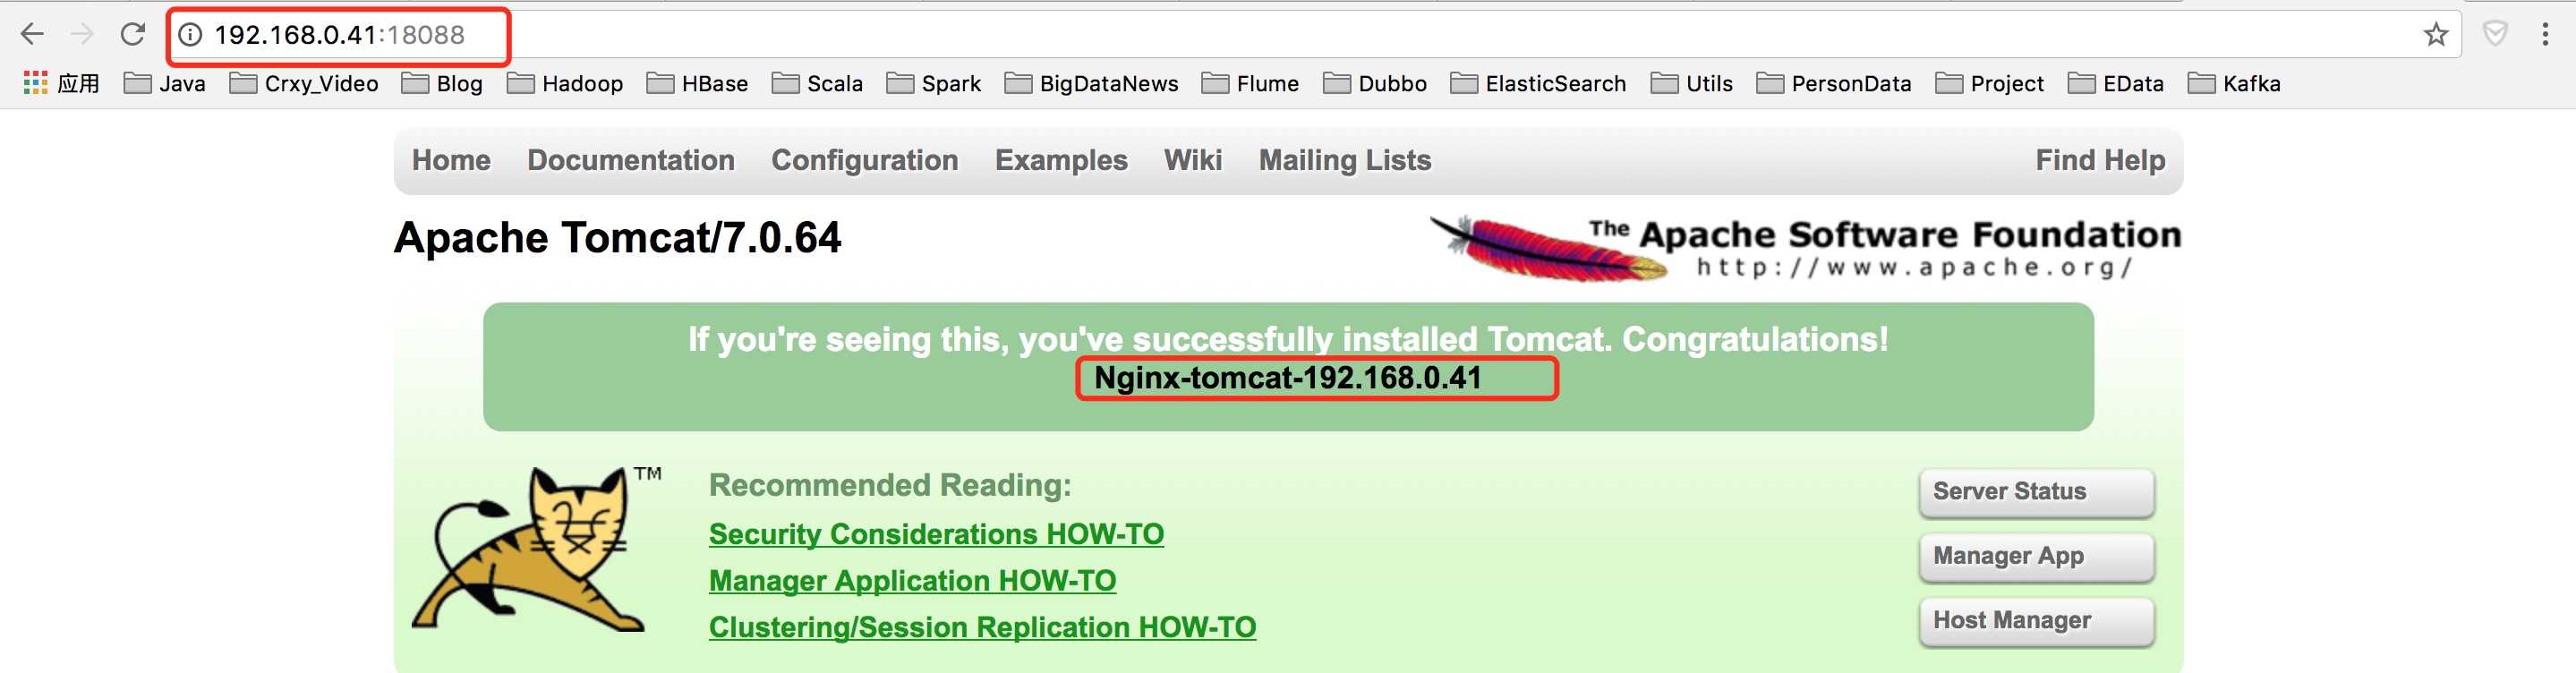
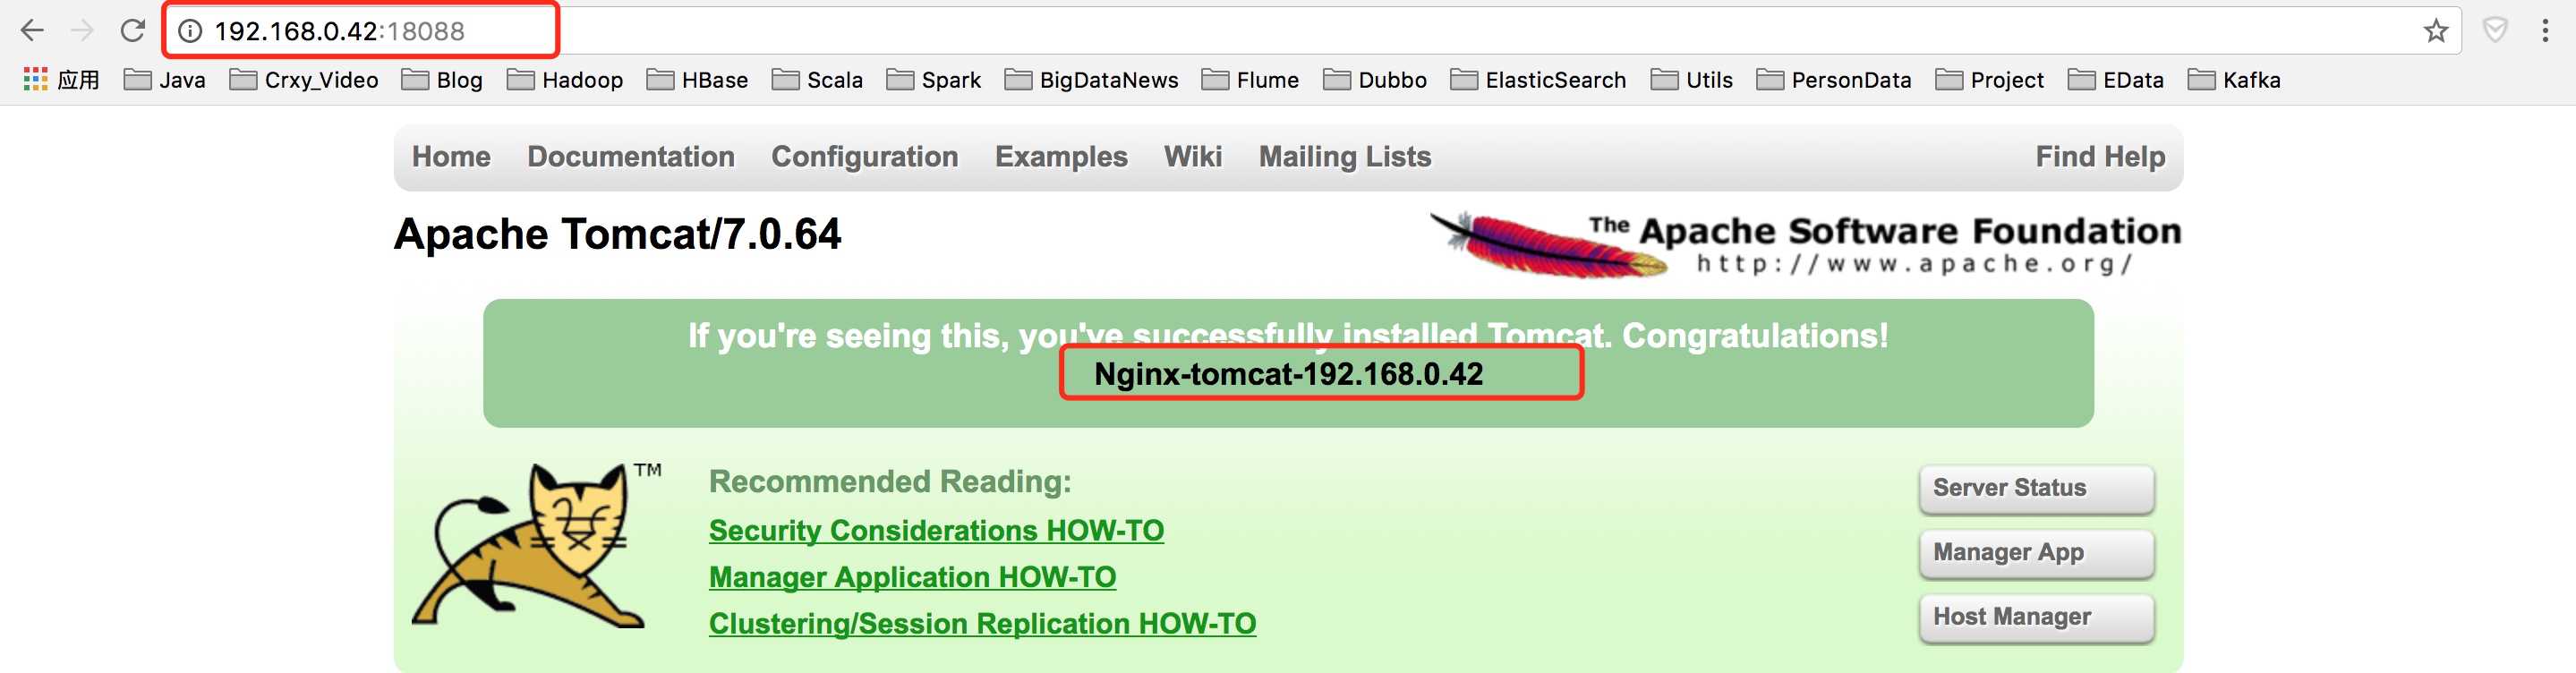
5、nginx访问看其效果(建议在隐身模式下刷新,会轮询显示两个服务,防止页面缓存)
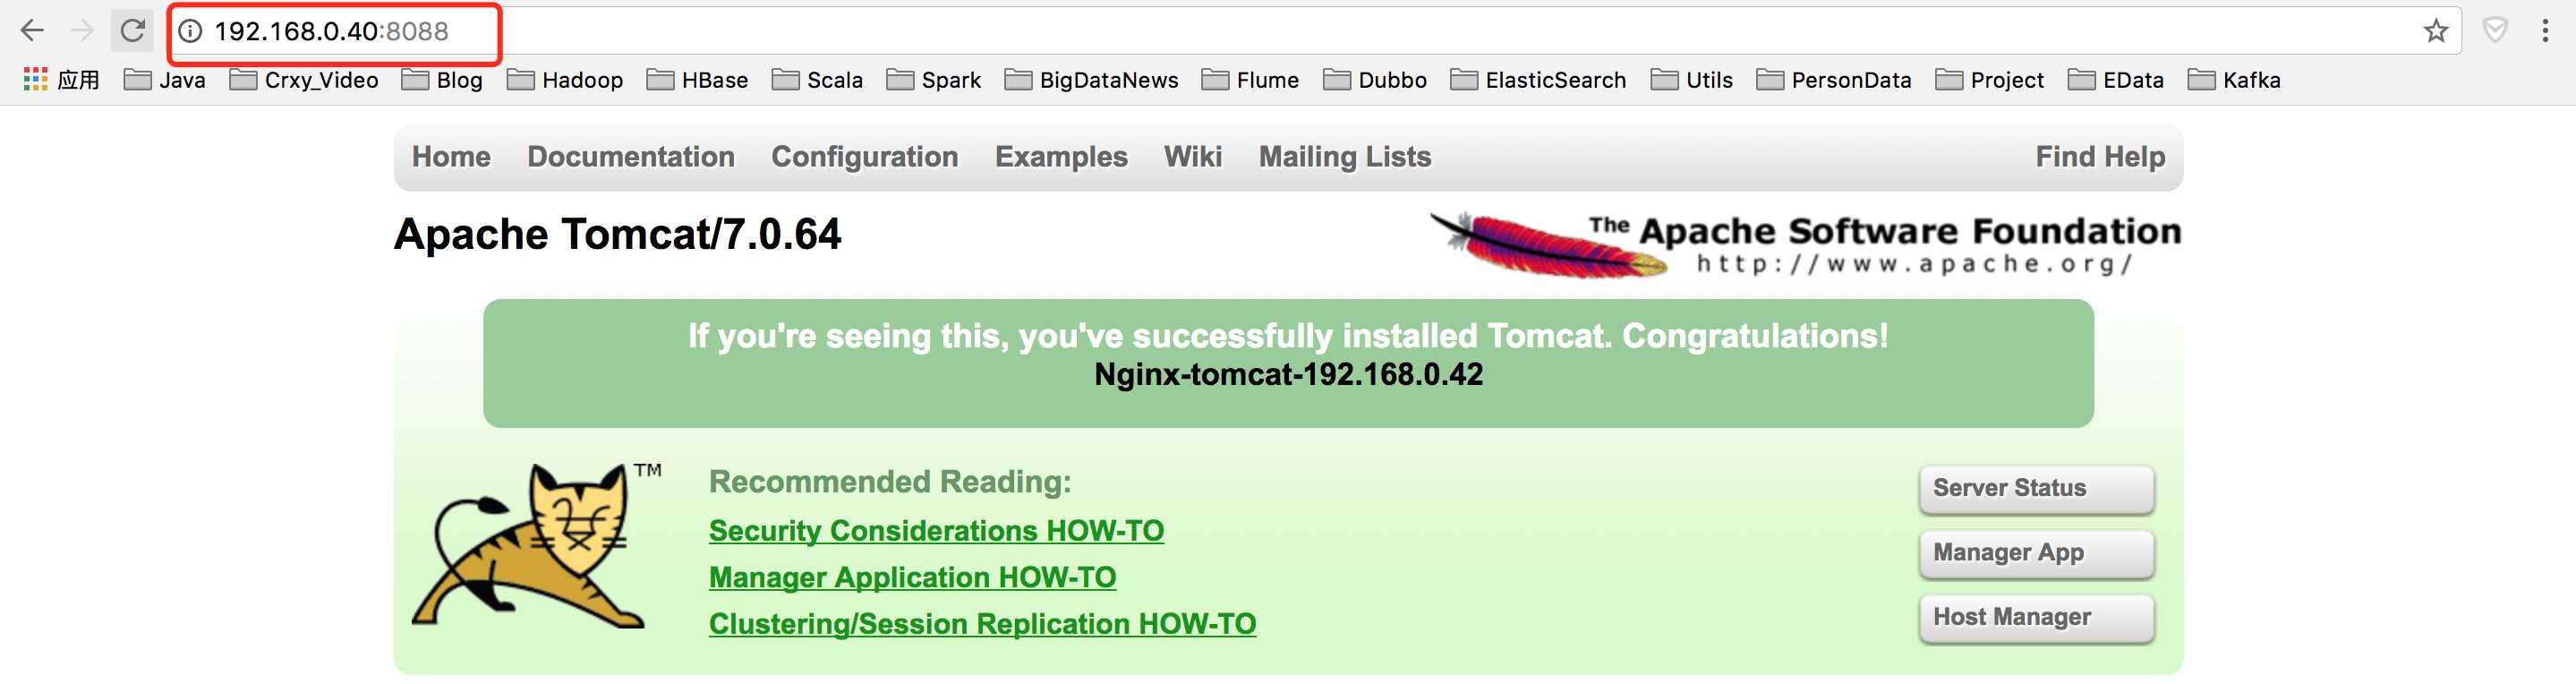
6、如果停掉其中某一台tomcat,再次访问刷新时,只显示一个tomcat的信息.
验证完毕,刷新40的Nginx,会随机出现41、42的应用
5. 命令
5.1. 帮助
|
1 2 3 4 5 6 7 8 9 10 11 12 13 14 15 16 |
[root@namenode40 nginx-1.12.0]# ./objs/nginx -h nginx version: nginx/1.12.0 Usage: nginx [-?hvVtTq] [-s signal] [-c filename] [-p prefix] [-g directives] Options: -?,-h : this help -v : show version and exit -V : show version and configure options then exit -t : test configuration and exit -T : test configuration, dump it and exit -q : suppress non-error messages during configuration testing -s signal : send signal to a master process: stop, quit, reopen, reload -p prefix : set prefix path (default: /usr/local/nginx/) -c filename : set configuration file (default: conf/nginx.conf) -g directives : set global directives out of configuration file |
5.2. 检测配置文件
./objs/nginx -t -c conf/nginx.conf
5.3. 启动
./objs/nginx
启动并制定 nginx_home 用于日志和数据临时目录
-p prefix : set prefix path (default: /usr/local/nginx/)
./objs/nginx -p ./
5.4. 关闭
./objs/nginx -s stop
5.5. 刷新配置
./objs/nginx -s reload
原创文章,转载请注明: 转载自LoserZhao – 诗和远方[ http://www.loserzhao.com/ ]
本文链接地址: http://www.loserzhao.com/bigdata-maintenance/nginx-install-and-configuration-tomcat-ha.html
文章的脚注信息由WordPress的wp-posturl插件自动生成
0 条评论。